Retaining Walls Solutions Available in Auckland
If you live on a sloped property, you're likely already aware of the crucial role that retaining walls play in both managing land and enhancing outdoor usability. A well-constructed retaining wall not only supports soil and prevents erosion but also adds structure and aesthetic appeal to your landscape. For homeowners considering retaining walls Auckland, it’s essential to choose the right materials for the specific demands of the site—whether you're dealing with clay-heavy soil, significant rainfall, or a high load-bearing area. Equally important is following industry best practices and engineering standards. Professional guidelines help determine the appropriate wall height, structural support, drainage requirements, and material specifications based on the size and mass of what’s being retained. This is particularly critical for sloped or uneven terrain, where the risk of soil movement is higher. When undertaking New Lynn residential excavation or similar site preparation work in other parts of Auckland, consulting with experienced contractors can ensure long-term stability and compliance with local regulations. Retaining walls often form the foundation of broader residential landscaping Auckland projects, providing a framework for features such as gardens, patios, decks, and pathways. Investing in quality design and construction upfront will pay off in the durability, safety, and visual appeal of your outdoor space for years to come.
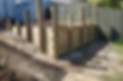
Constructing a timber pole retaining wall involves several steps to ensure its stability and longevity. Here is a general overview of the process:
-
Planning and Design:
-
Determine the height and length of the retaining wall.
-
Check local building codes and regulations for any specific requirements.
-
Calculate the amount of materials needed, including timber poles, backfill, gravel, drainage pipes, and compacting equipment.
-
-
Materials and Tools:
-
Purchase pressure-treated timber poles suitable for ground contact, (NZ regulations stipulate H5/H6 treated poles and H4 treated rails)
-
Gather necessary tools such as a shovel, tape measure, level, saw, drill, and safety equipment.
-
-
Site Preparation:
-
Clear the area where the wall will be built.
-
Drill holes either by manual or mechanical means to a depth greater than the planned finished height of the retaining wall.
-
-
Installation of Timber Poles:
-
Set the timber poles in the holes, making sure they are level and aligned.
-
Sink the poles deep enough to provide stability, considering the wall's height and the soil conditions.
-
Secure the poles together with appropriate connectors and hardware.
-
-
Backfilling and Drainage:
-
Fill the space behind the wall with gravel or suitable backfill material.
-
Install drainage pipes if necessary to prevent water buildup.
-
-
Finishing Touches:
-
Add topsoil or a cap to the wall to improve aesthetics and protect the timber from weathering.
-
Conduct a final check to ensure the wall is structurally sound and properly secured.
-
-
Maintenance:
-
Regularly inspect the retaining wall for any signs of damage or erosion.
-
Address any issues promptly to prevent further deterioration.
-
It's crucial to follow best practices and consider consulting with a professional or engineer if you have any doubts about the design or construction of the retaining wall.